Deadzone: Rogue/Synergies: Difference between revisions
From The Tribes Depot
More actions
m added small sub notes to the Synergy sub-sections |
finished adding images to synergies |
||
| (3 intermediate revisions by the same user not shown) | |||
| Line 7: | Line 7: | ||
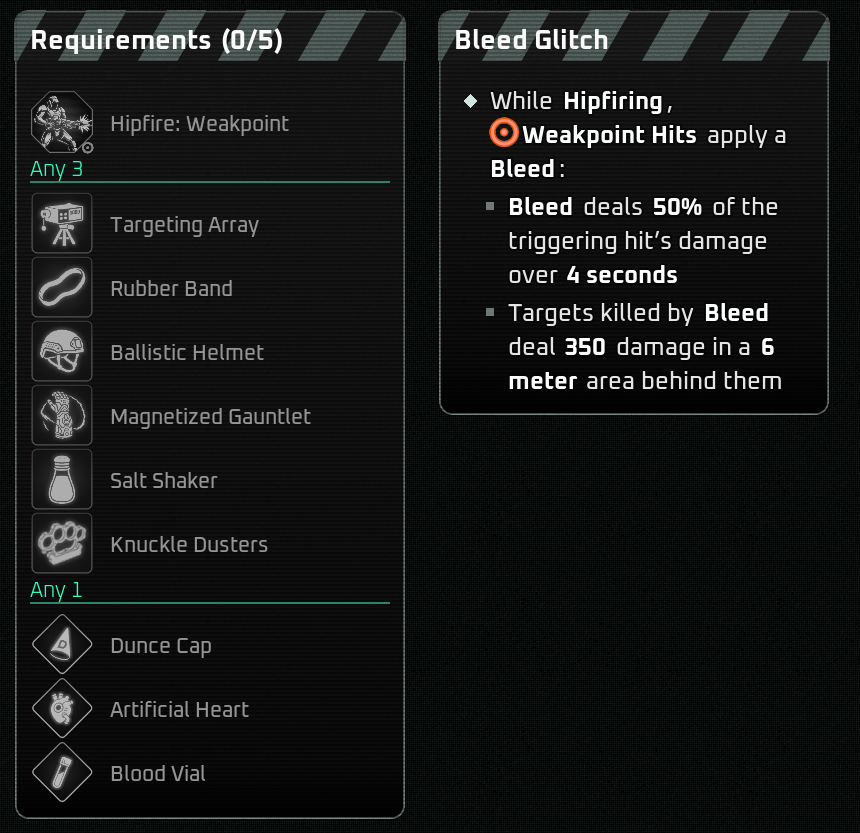
=== 1. Bleed Glitch === | === 1. Bleed Glitch === | ||
[[File:Bleed Glitch.png]] | |||
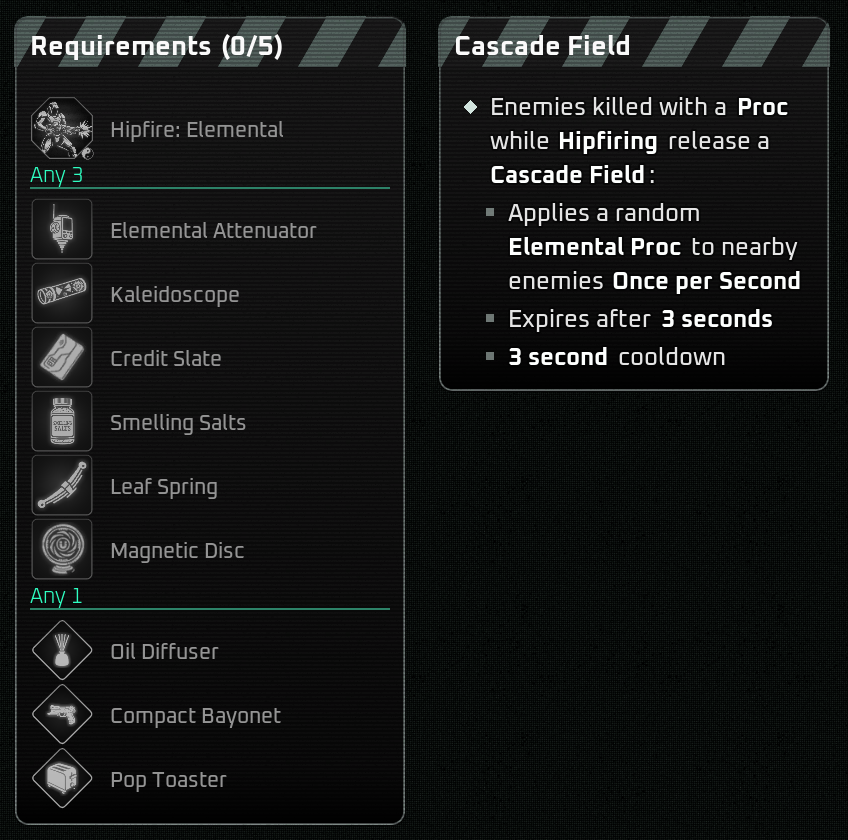
=== 2. Cascade Field === | === 2. Cascade Field === | ||
[[File:Cascade Field.png]] | |||
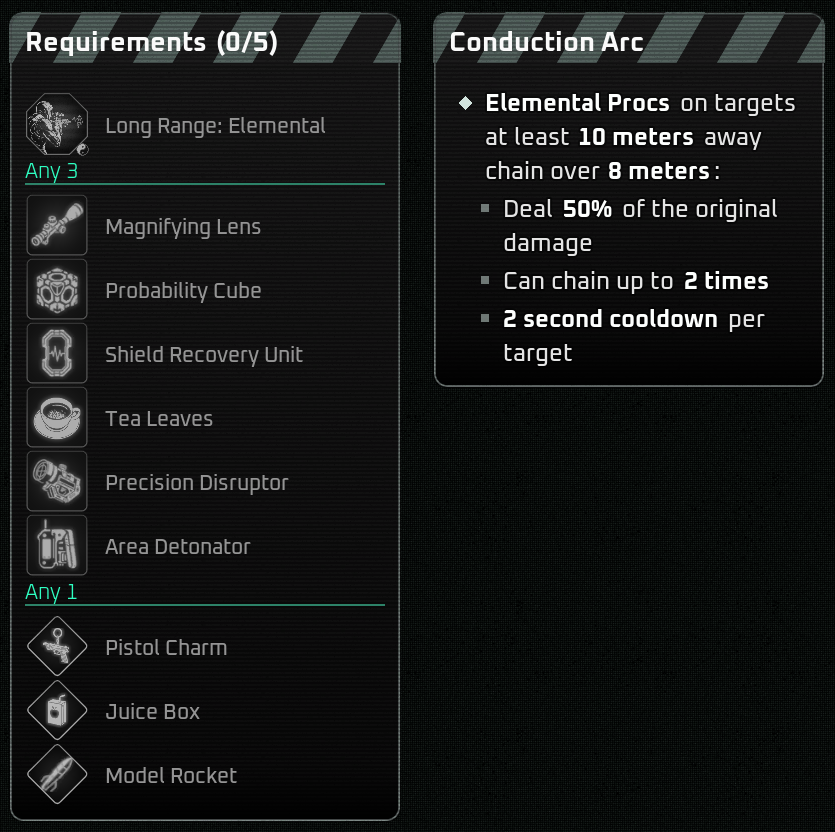
=== 3. Conduction Arc === | === 3. Conduction Arc === | ||
[[File:Conduction Arc.png]] | |||
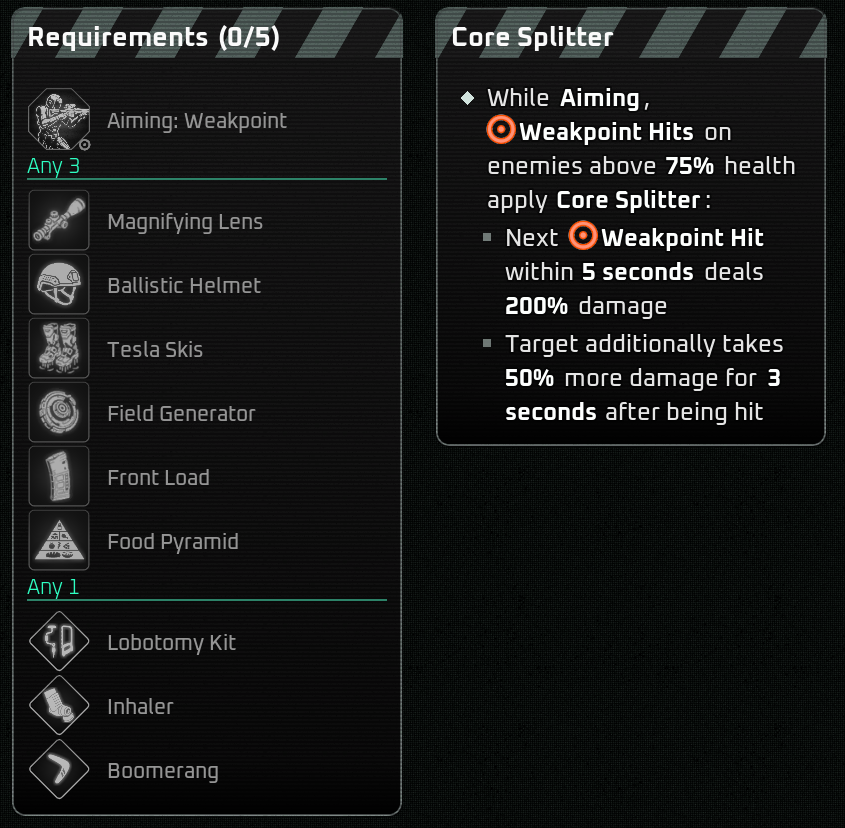
=== 4. Core Splitter === | === 4. Core Splitter === | ||
[[File:Core Splitter.png]] | |||
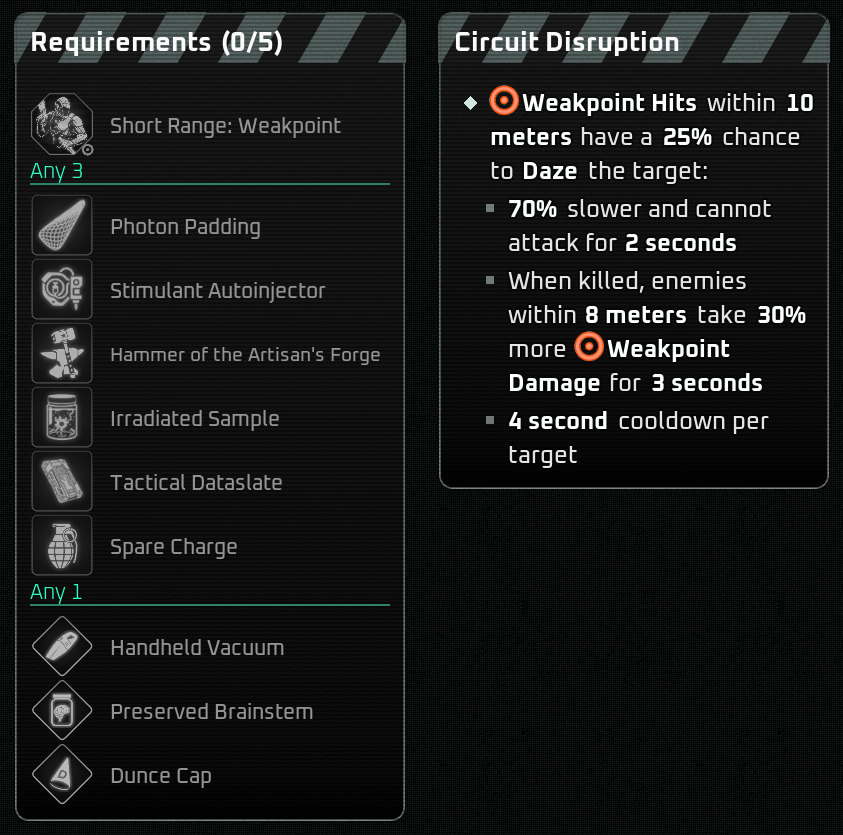
=== 5. Circuit Disruption === | === 5. Circuit Disruption === | ||
[[File:Circuit Disruption.png]] | |||
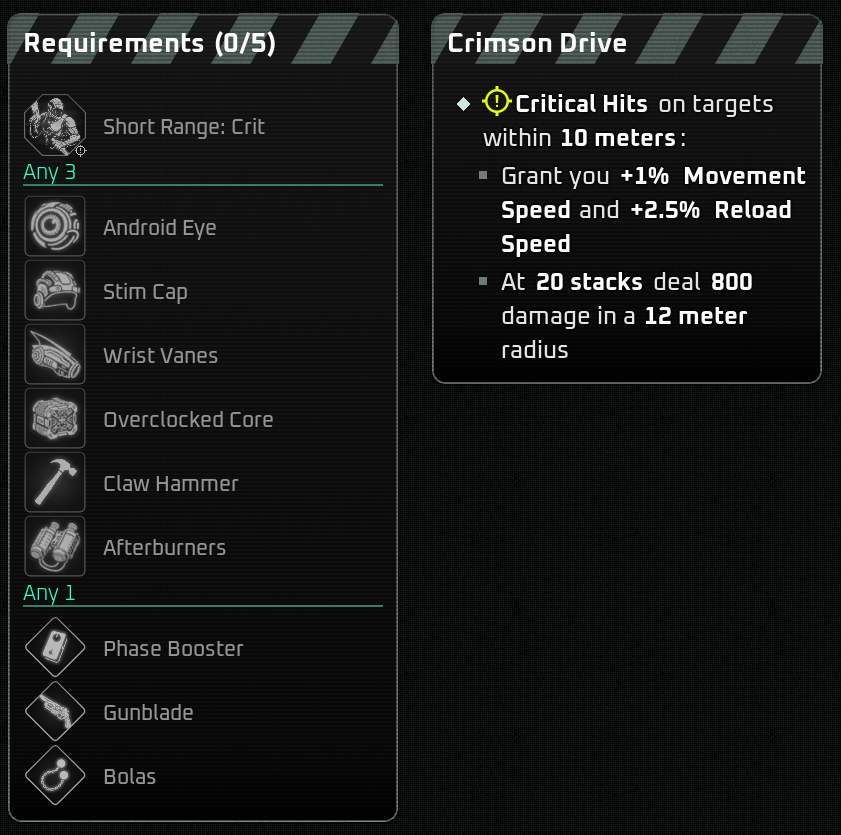
=== 6. Crimson Drive === | === 6. Crimson Drive === | ||
[[File:Crimson Drive.png]] | |||
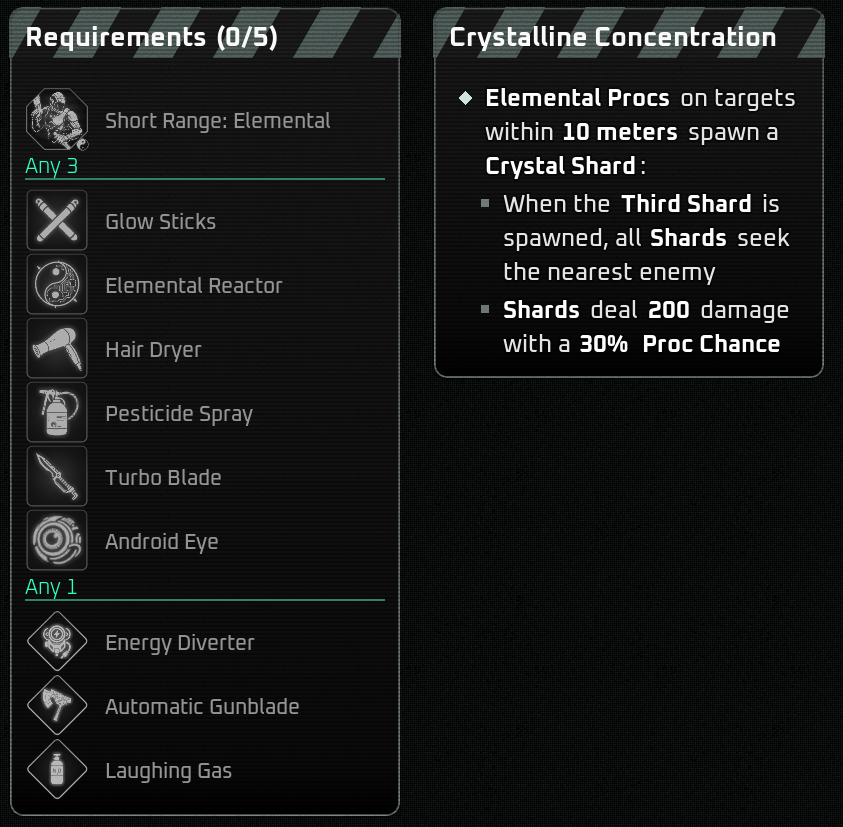
=== 7. Crystalline Concentration === | === 7. Crystalline Concentration === | ||
[[File:Crystalline Concentration.png]] | |||
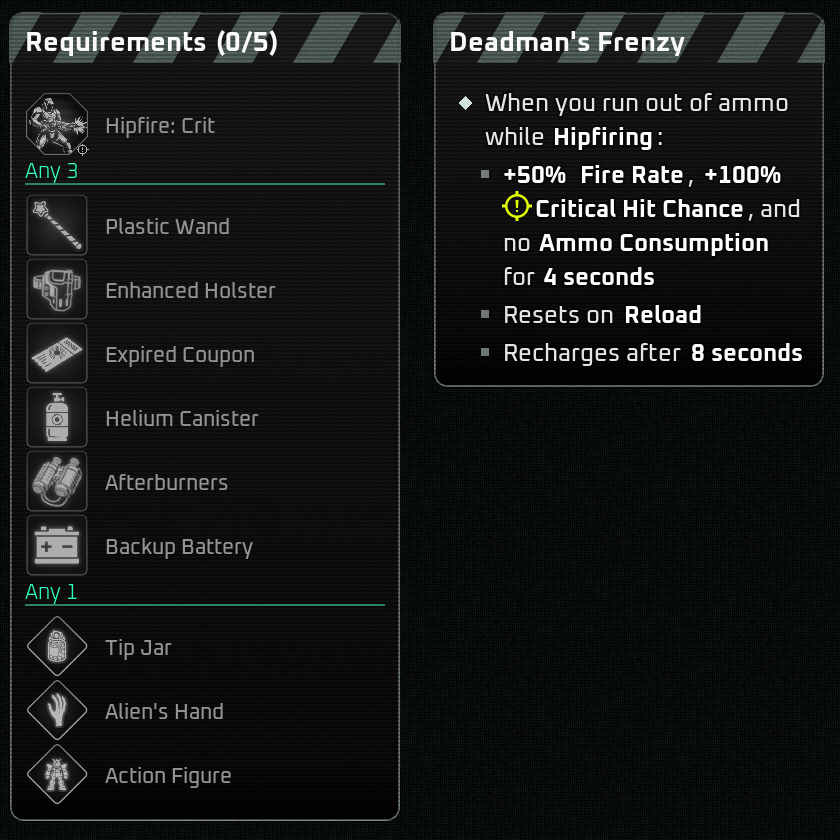
=== 8. Deadman's Frenzy === | === 8. Deadman's Frenzy === | ||
[[File:Deadman's Frenzy.png]] | |||
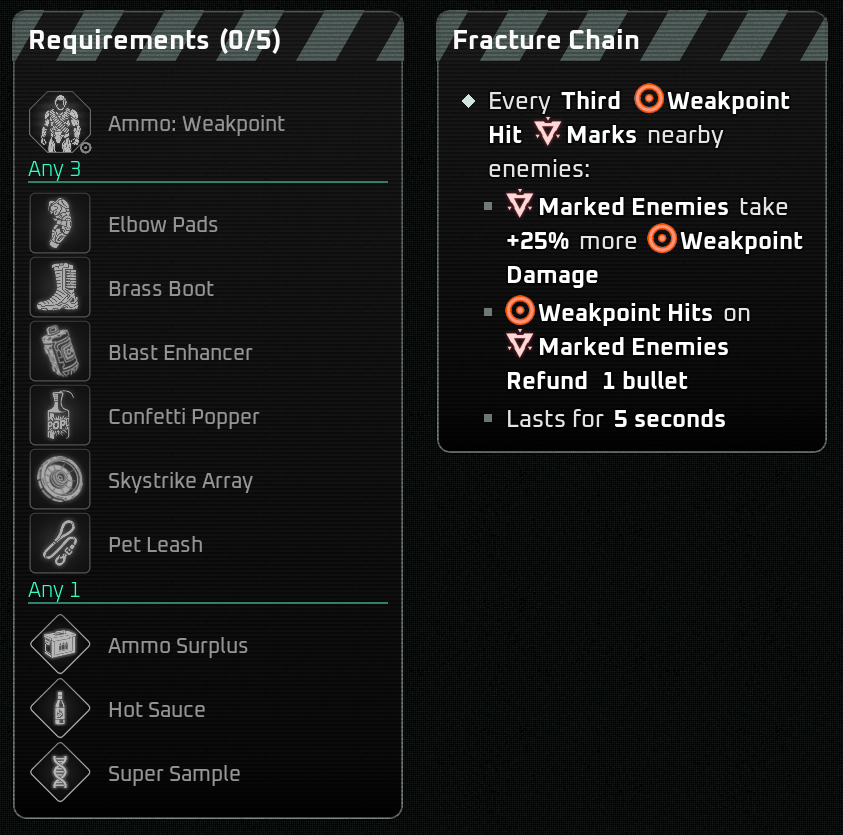
=== 9. Fracture Chain === | === 9. Fracture Chain === | ||
[[File:Fracture Chain.png]] | |||
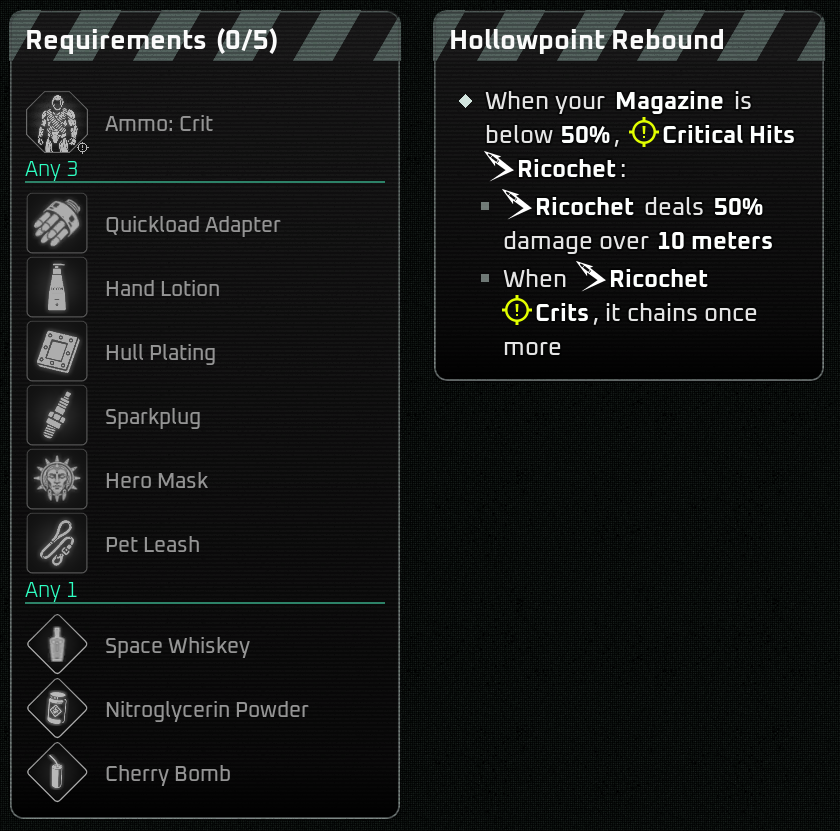
=== 10. Hollowpoint Rebound === | === 10. Hollowpoint Rebound === | ||
[[File:Hollowpoint Rebound.png]] | |||
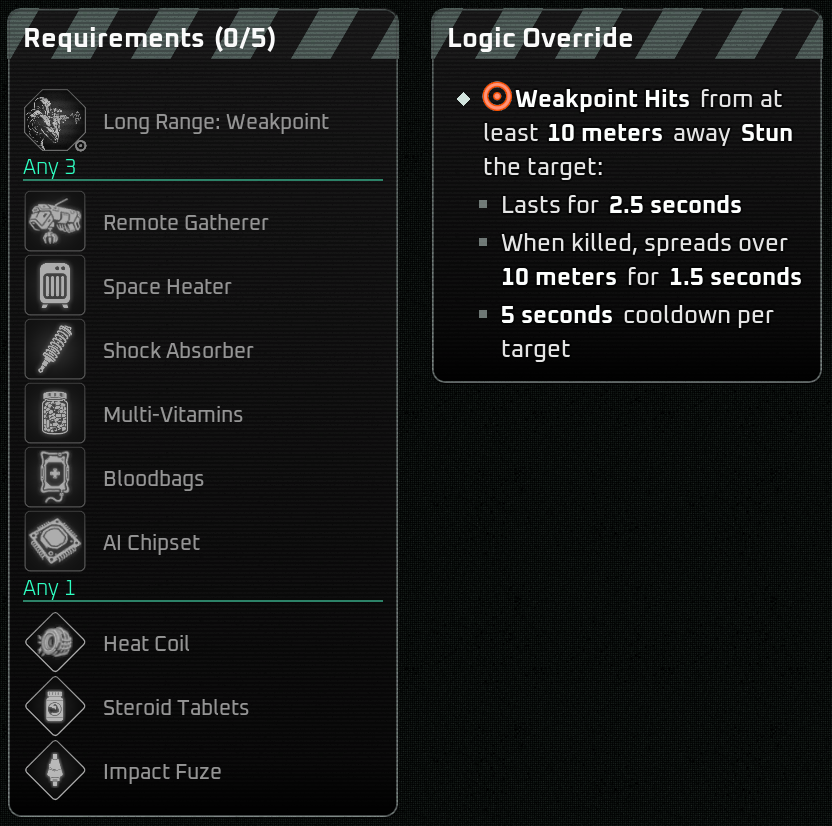
=== 11. Logic Override === | === 11. Logic Override === | ||
[[File:Logic Override.png]] | |||
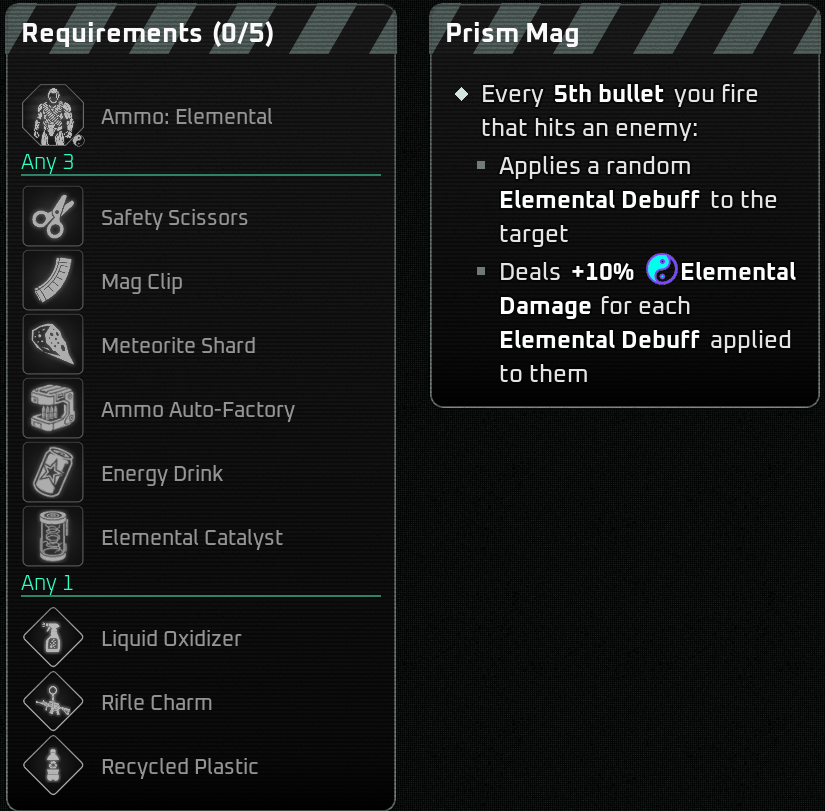
=== 12. Prism Mag === | === 12. Prism Mag === | ||
[[File:Prism Mag.png]] | |||
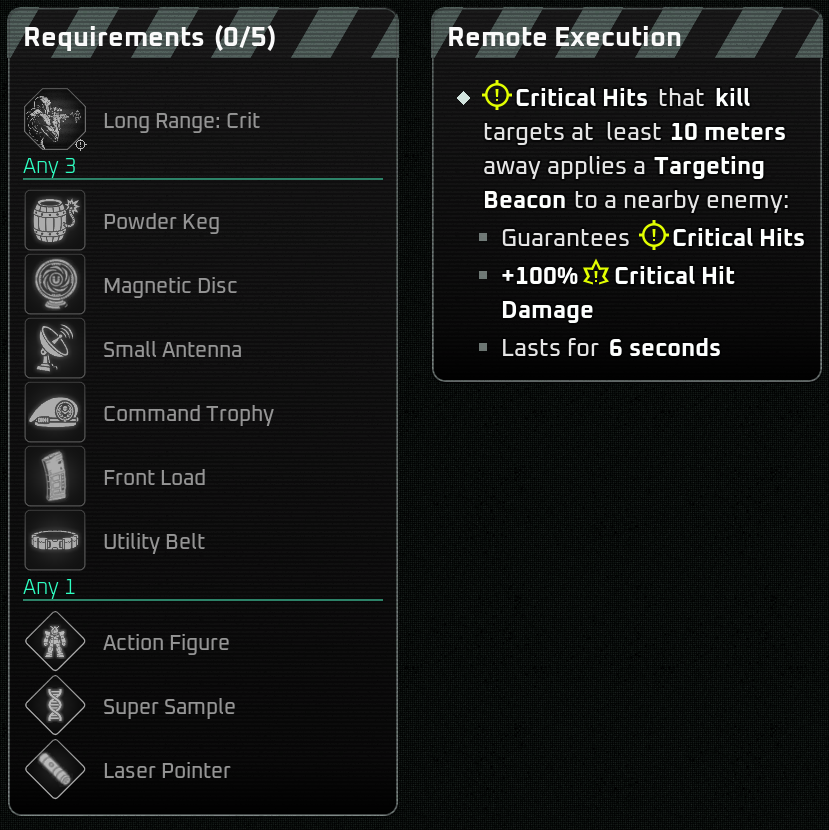
=== 13. Remote Execution === | === 13. Remote Execution === | ||
[[File:Remote Execution2.png]] | |||
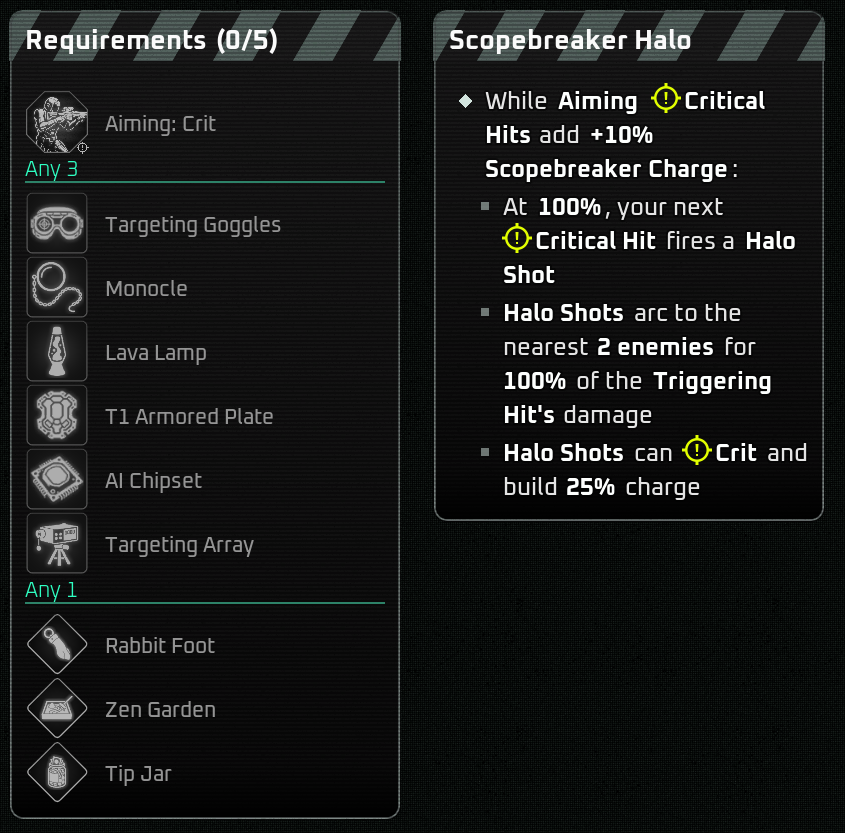
=== 14. Scopebreaker Halo === | === 14. Scopebreaker Halo === | ||
[[File:Scopebreaker Halo.png]] | |||
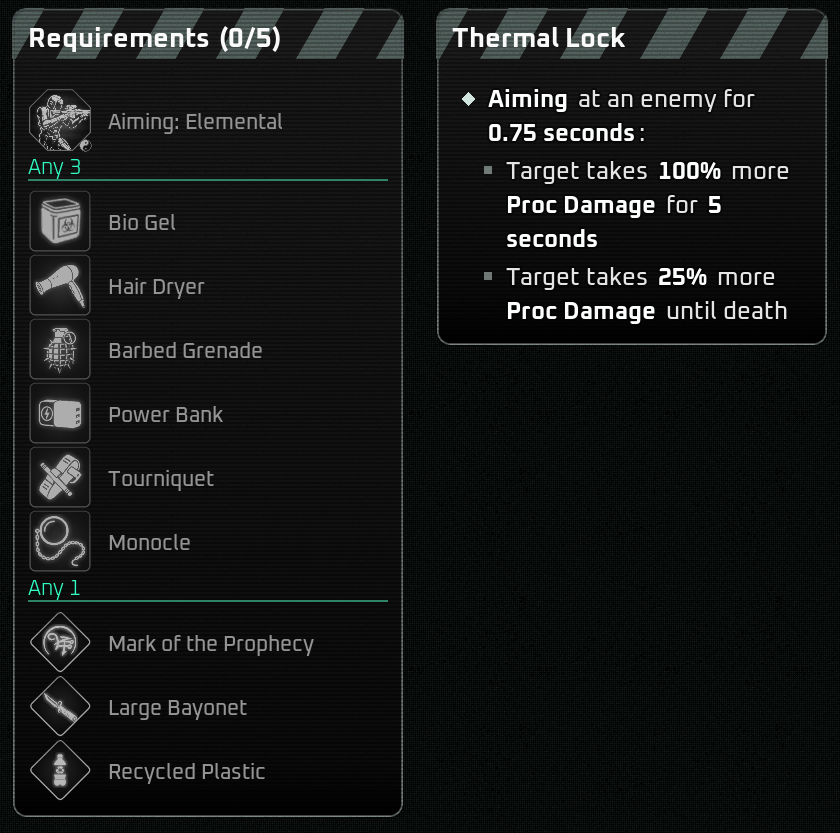
=== 15. Thermal Lock === | === 15. Thermal Lock === | ||
[[File:Thermal Lock.png]] | |||
== Perk Synergies == | == Perk Synergies == | ||
| Line 40: | Line 55: | ||
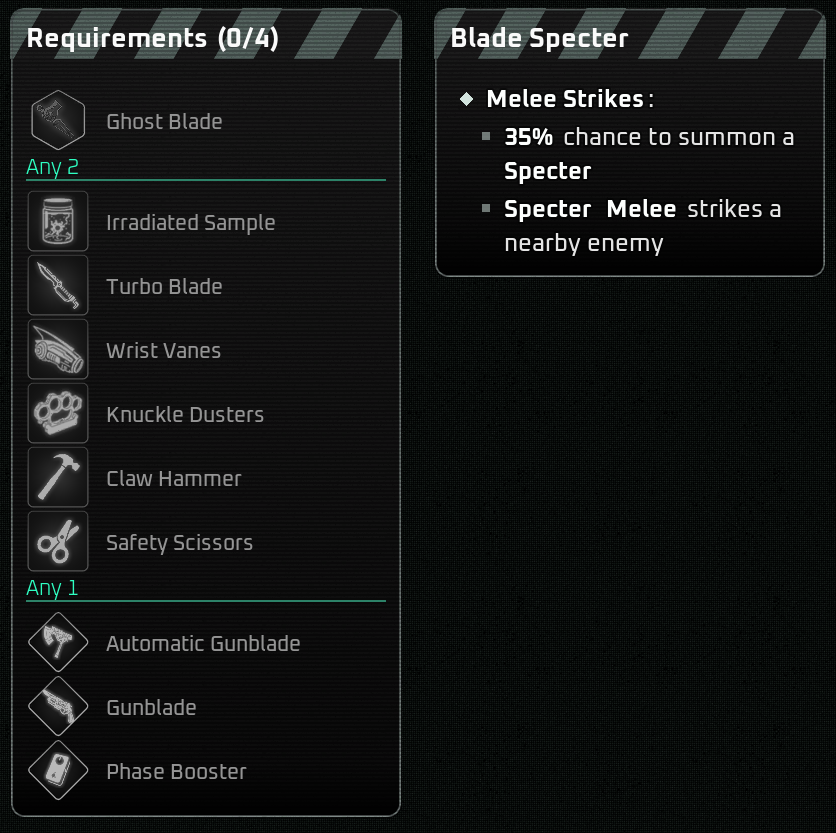
=== 1. Blade Specter === | === 1. Blade Specter === | ||
[[File:Blade Specter2.png]] | |||
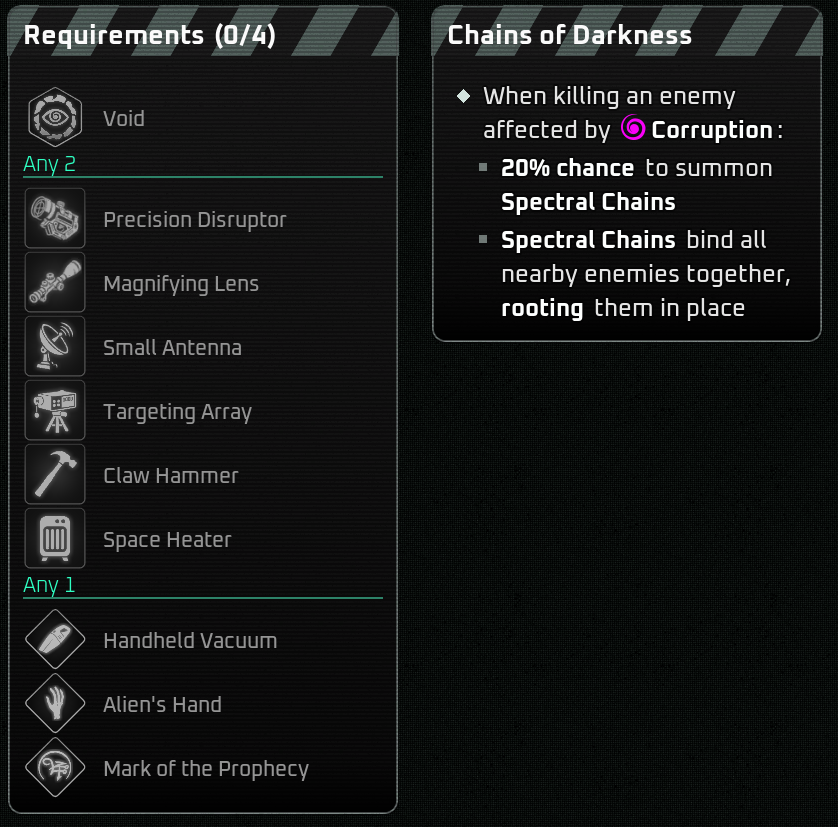
=== 2. Chains of Darkness === | === 2. Chains of Darkness === | ||
[[File:Chains of Darkness.png]] | |||
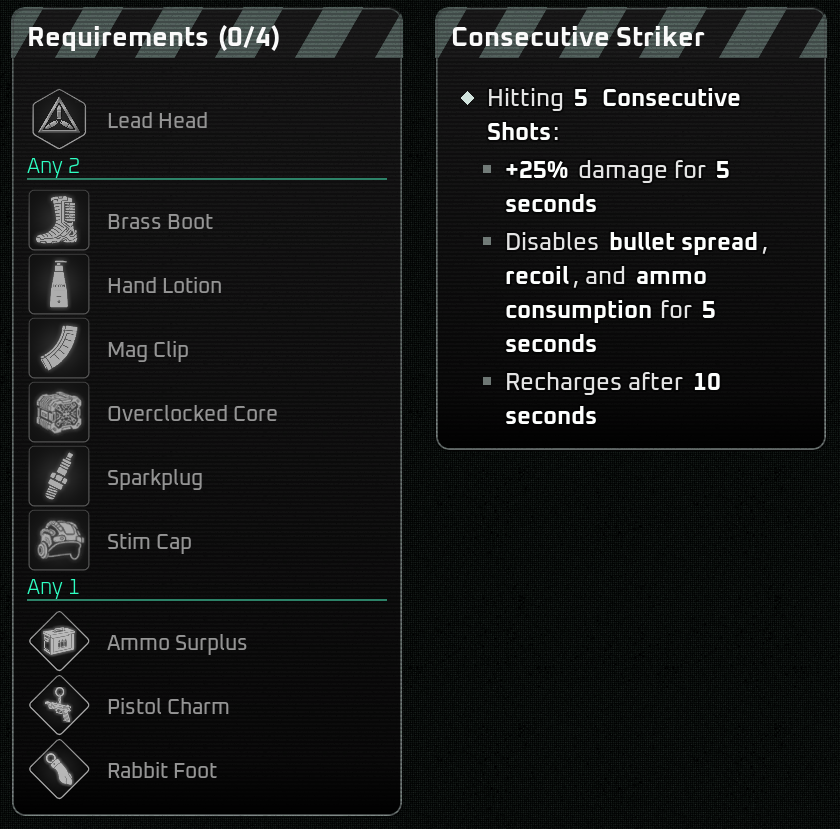
=== 3. Consecutive Striker === | === 3. Consecutive Striker === | ||
[[File:Consecutive Striker.png]] | |||
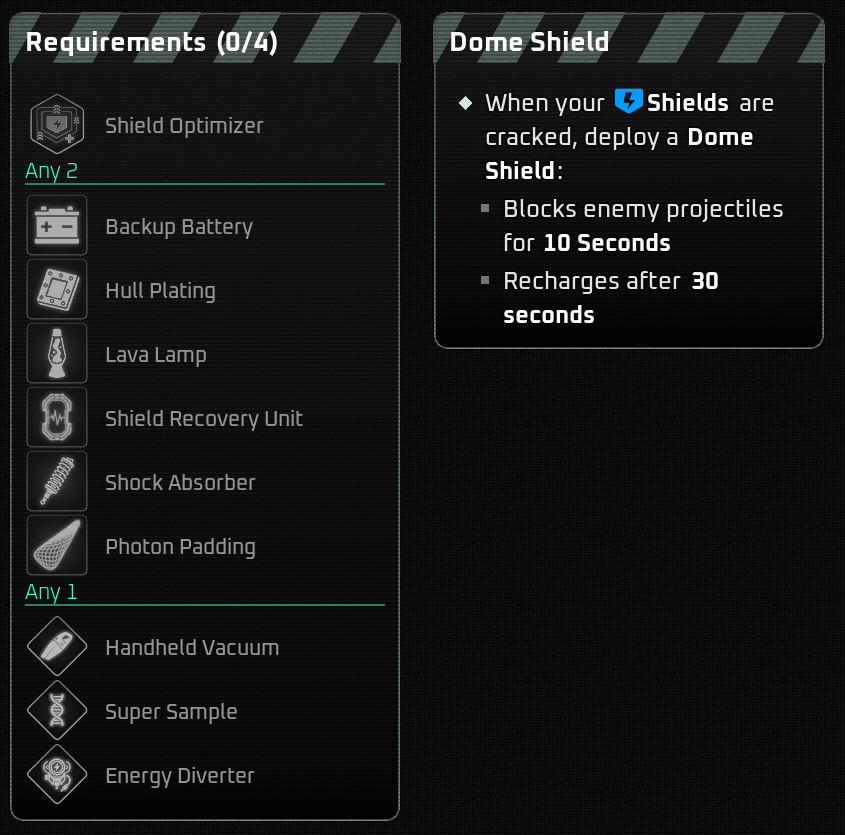
=== 4. Dome Shield === | === 4. Dome Shield === | ||
[[File:Dome Shield.png]] | |||
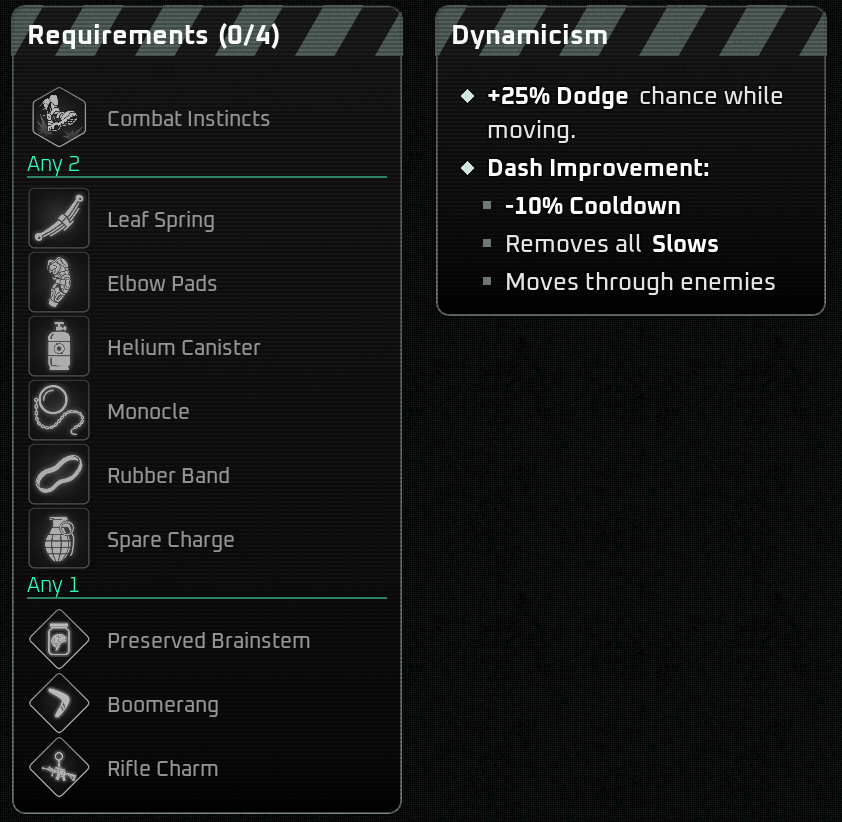
=== 5. Dynamicism === | === 5. Dynamicism === | ||
[[File:Dynamicism.png]] | |||
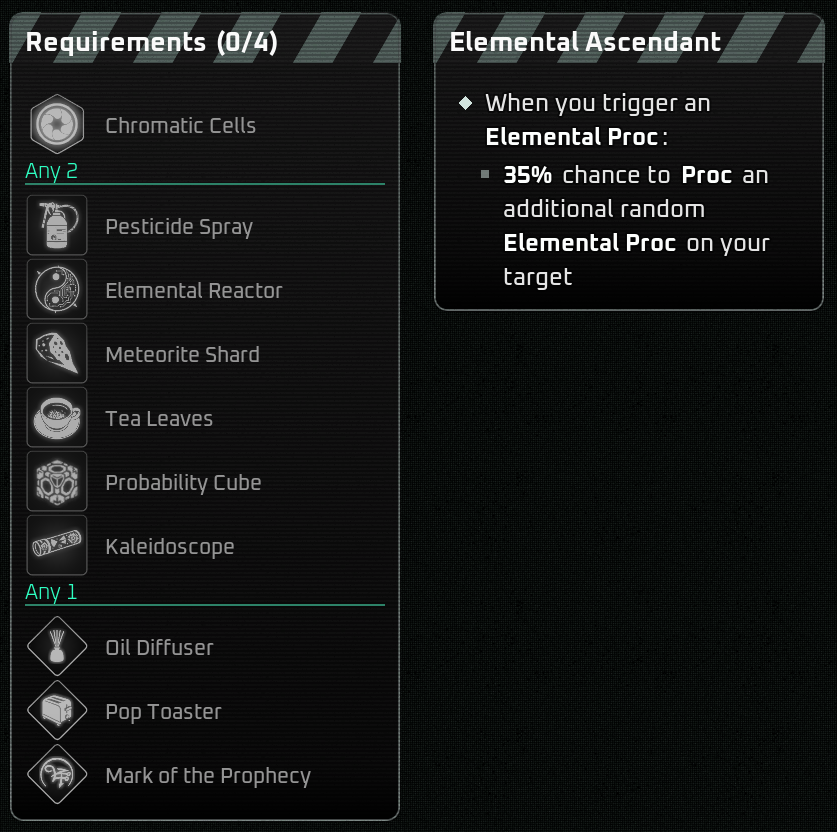
=== 6. Elemental Ascendant === | === 6. Elemental Ascendant === | ||
[[File:Elemental Ascendant.png]] | |||
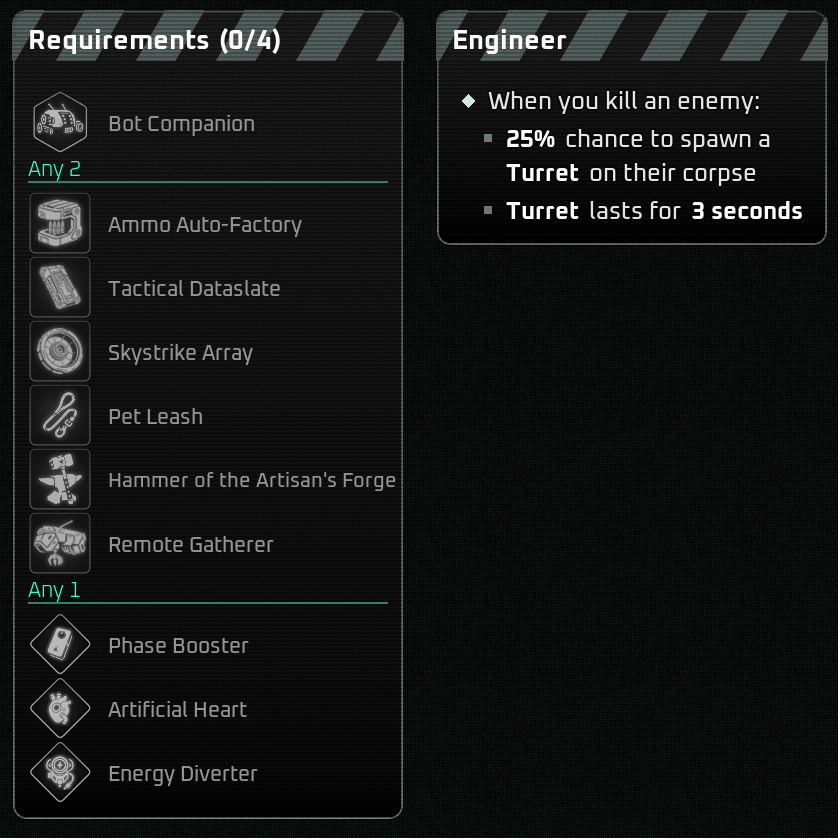
=== 7. Engineer === | === 7. Engineer === | ||
[[File:Engineer.png]] | |||
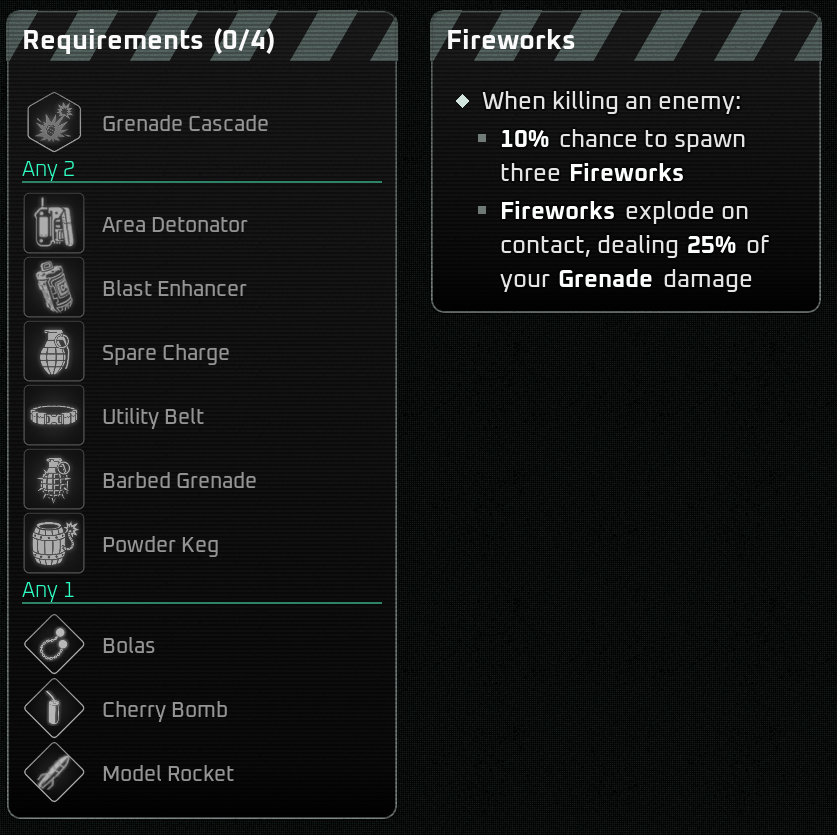
=== 8. Fireworks === | === 8. Fireworks === | ||
[[File:Fireworks.png]] | |||
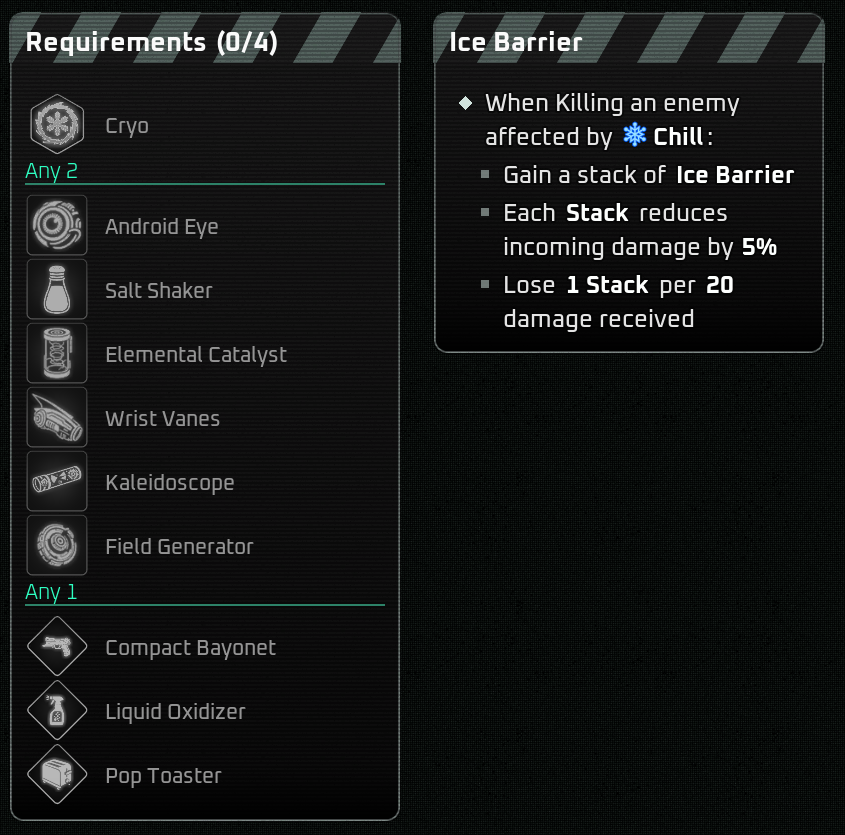
=== 9. Ice Barrier === | === 9. Ice Barrier === | ||
[[File:Ice Barrier.png]] | |||
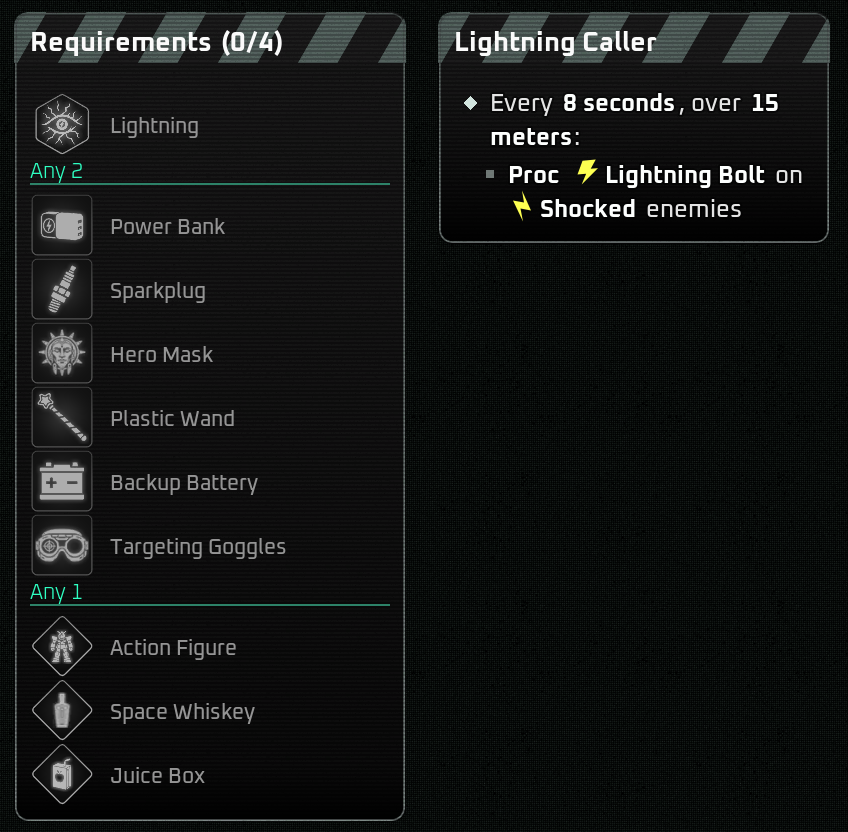
=== 10. Lightning Caller === | === 10. Lightning Caller === | ||
[[File:Lightning Caller.png]] | |||
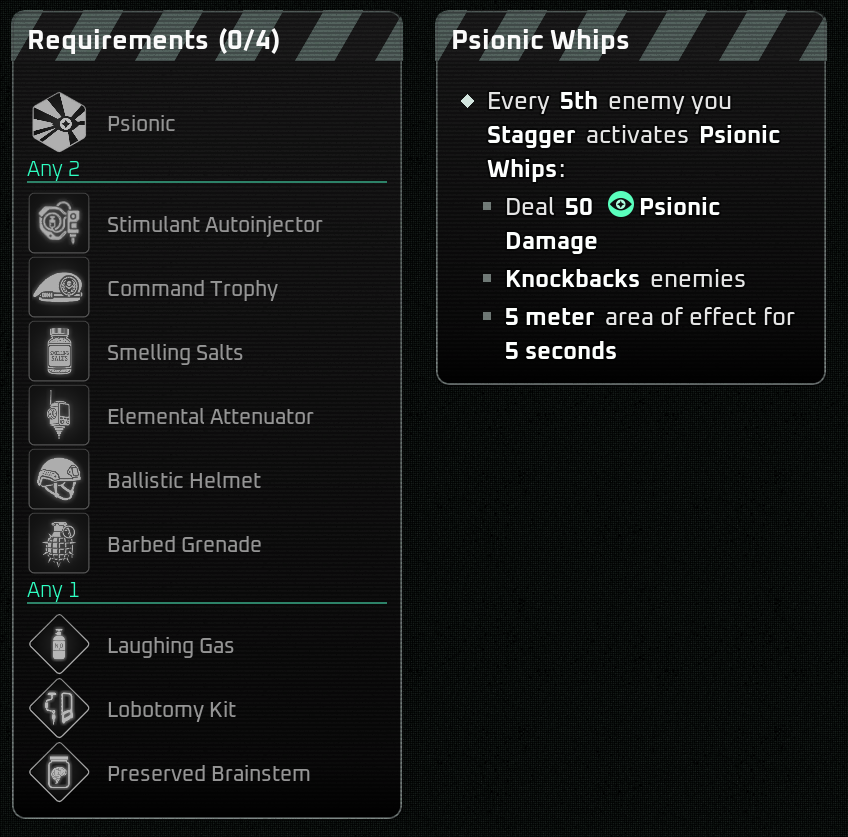
=== 11. Psionic Whips === | === 11. Psionic Whips === | ||
[[File:Psionic Whips.png]] | |||
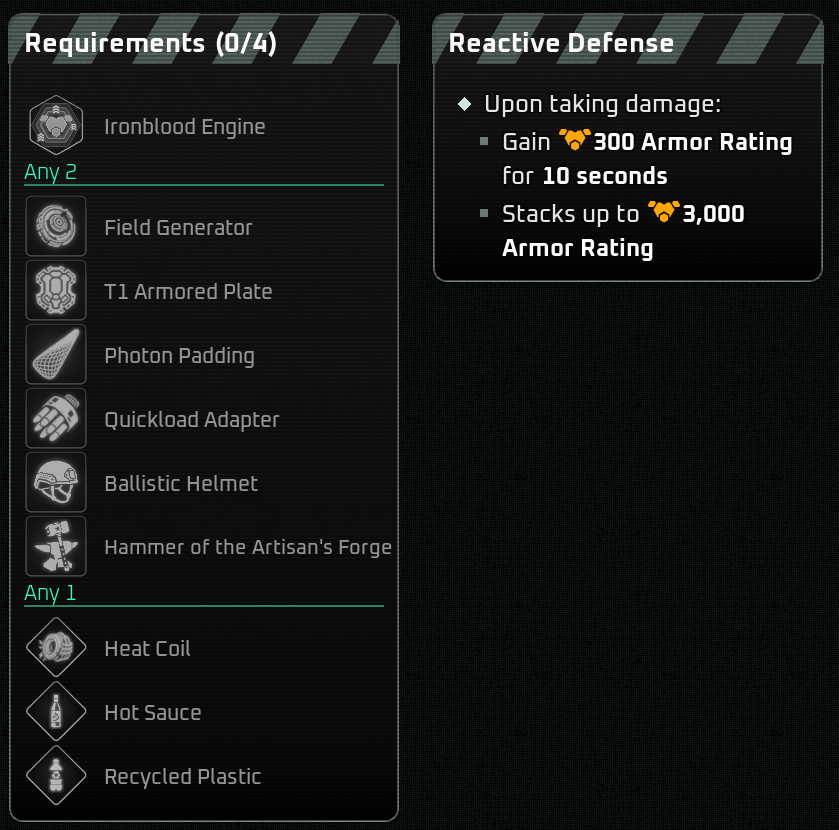
=== 12. Reactive Defense === | === 12. Reactive Defense === | ||
[[File:Reactive Defense.png]] | |||
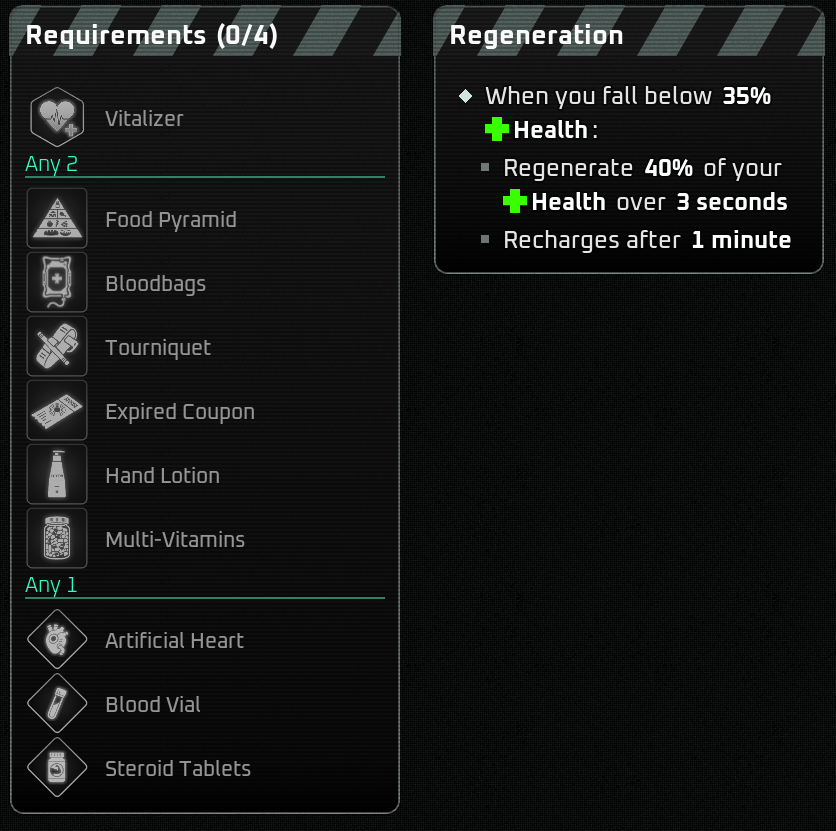
=== 13. Regeneration === | === 13. Regeneration === | ||
[[File:Regeneration.png]] | |||
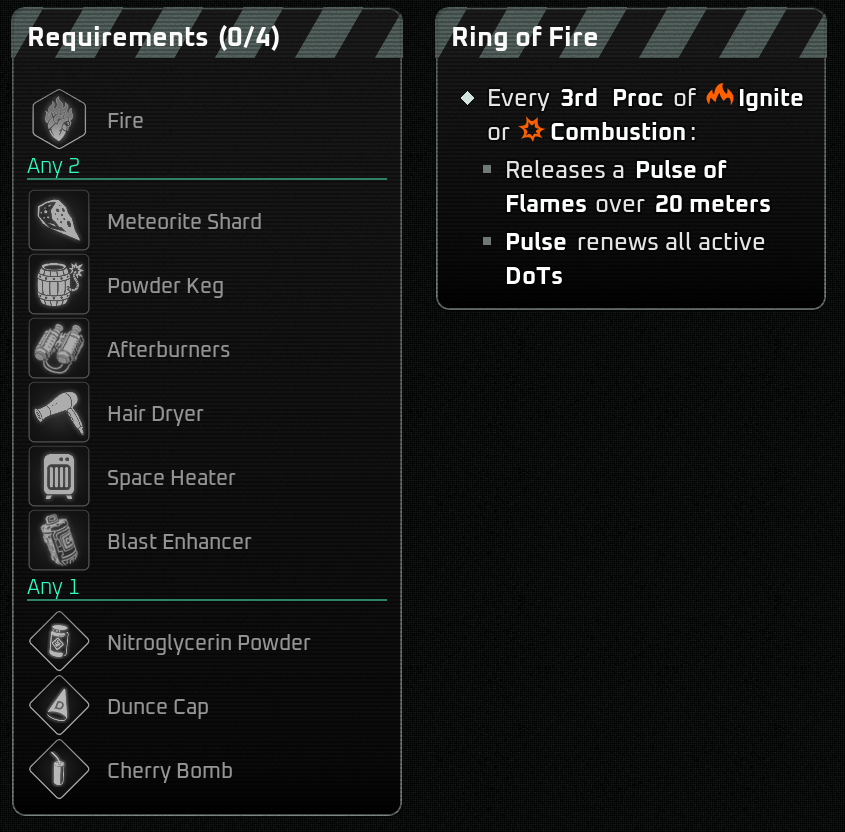
=== 14. Ring of Fire === | === 14. Ring of Fire === | ||
[[File:Ring of Fire.png]] | |||
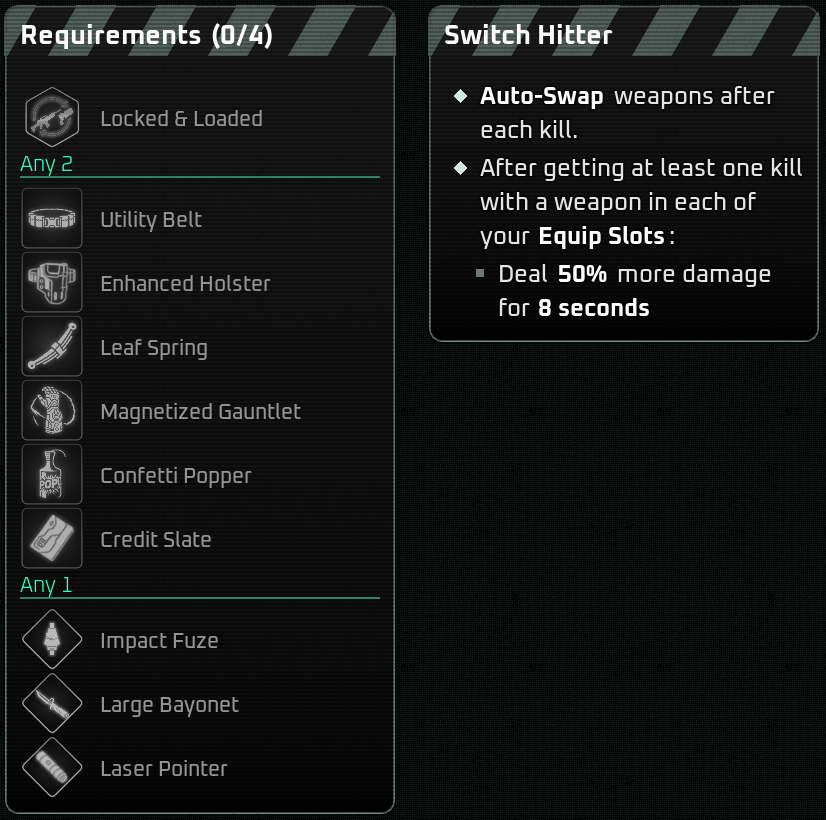
=== 15. Switch Hitter === | === 15. Switch Hitter === | ||
[[File:Switch Hitter.png]] | |||
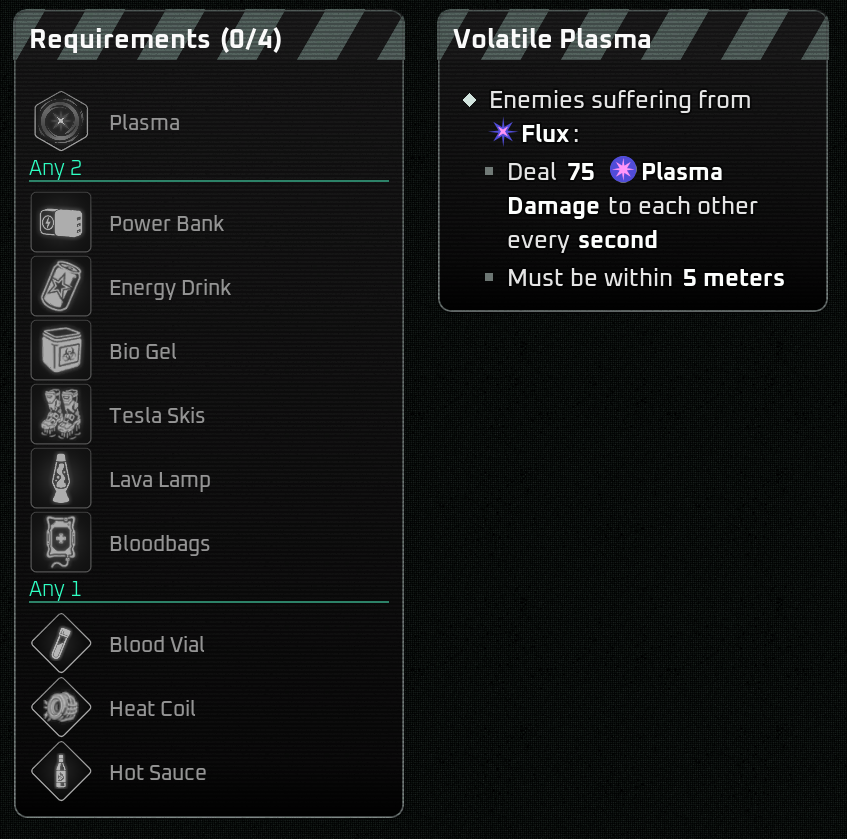
=== 16. Volatile Plasma === | === 16. Volatile Plasma === | ||
[[File:Volatile Plasma.png]] | |||
== Bonus Synergies == | == Bonus Synergies == | ||
| Line 75: | Line 106: | ||
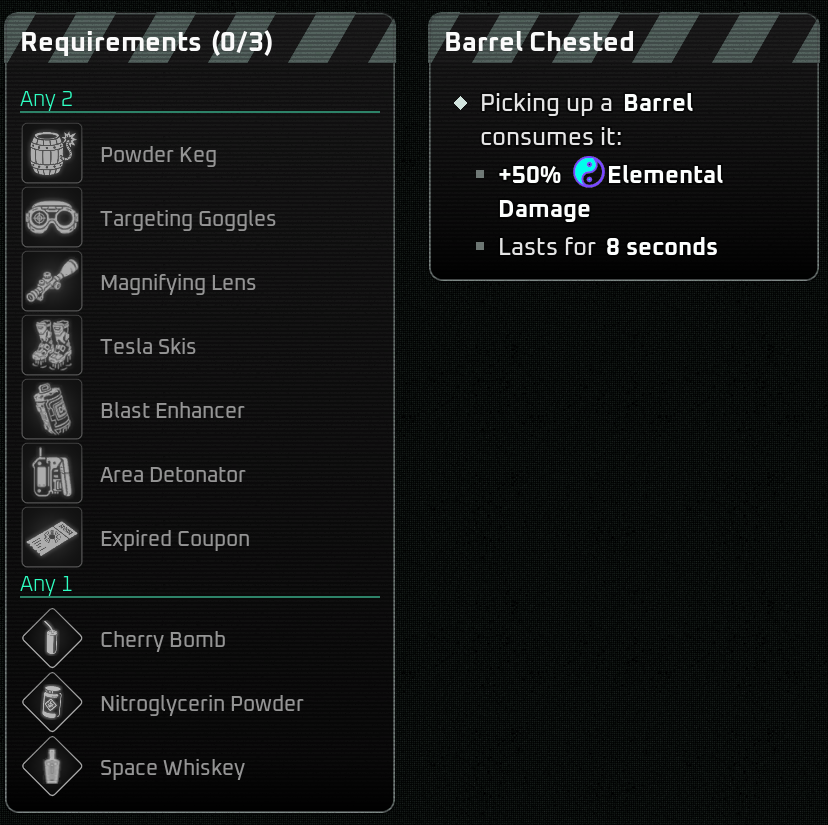
=== 1. Barrel Chested === | === 1. Barrel Chested === | ||
[[File:Barrel Chested.png]] | |||
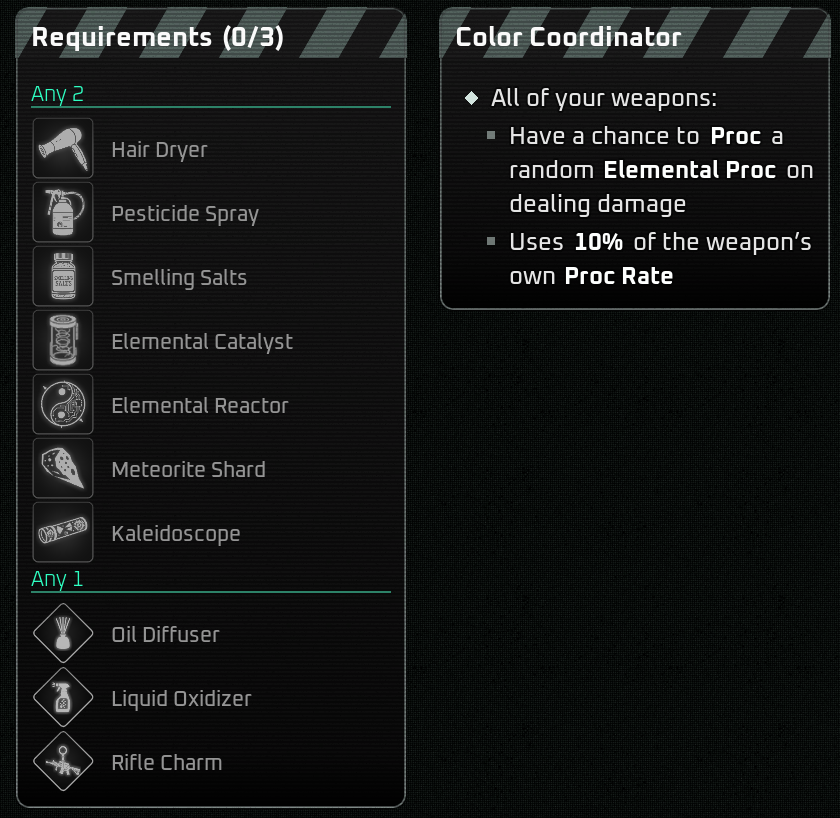
=== 2. Color Coordinator === | === 2. Color Coordinator === | ||
[[File:Color Coordinator.png]] | |||
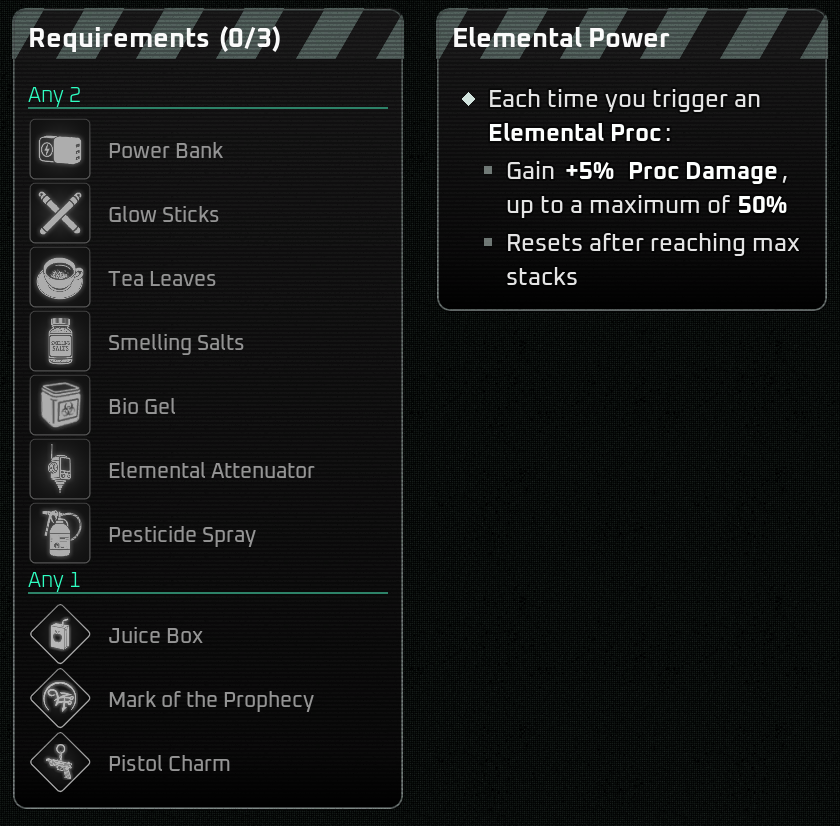
=== 3. Elemental Power === | === 3. Elemental Power === | ||
[[File:Elemental Power.png]] | |||
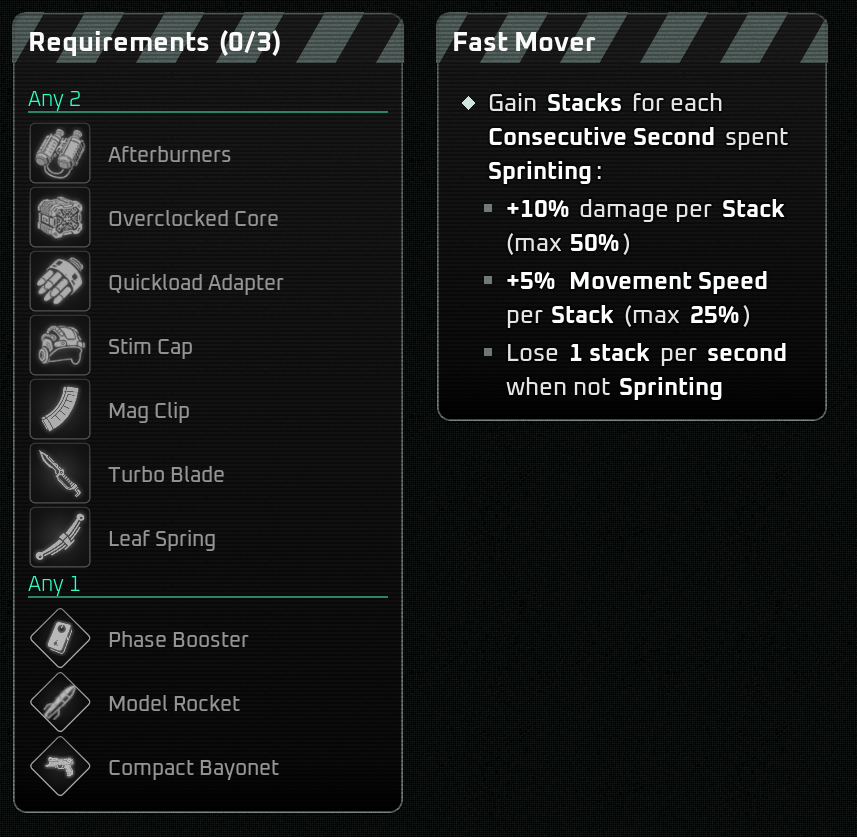
=== 4. Fast Mover === | === 4. Fast Mover === | ||
[[File:Fast Mover.png]] | |||
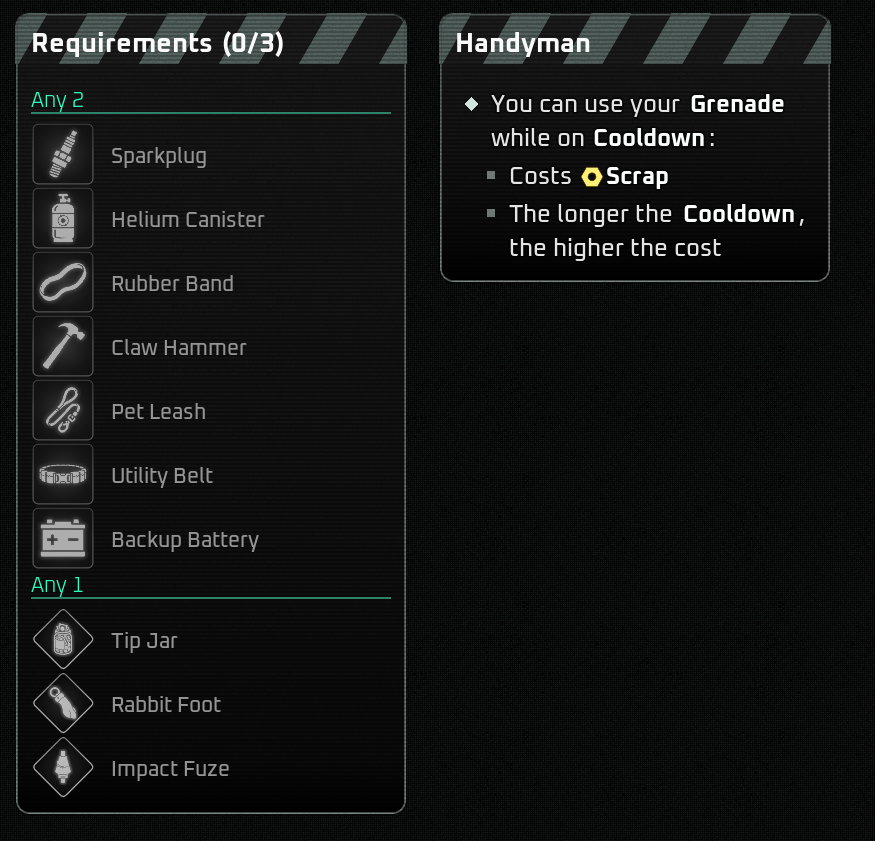
=== 5. Handyman === | === 5. Handyman === | ||
[[File:Handyman.png]] | |||
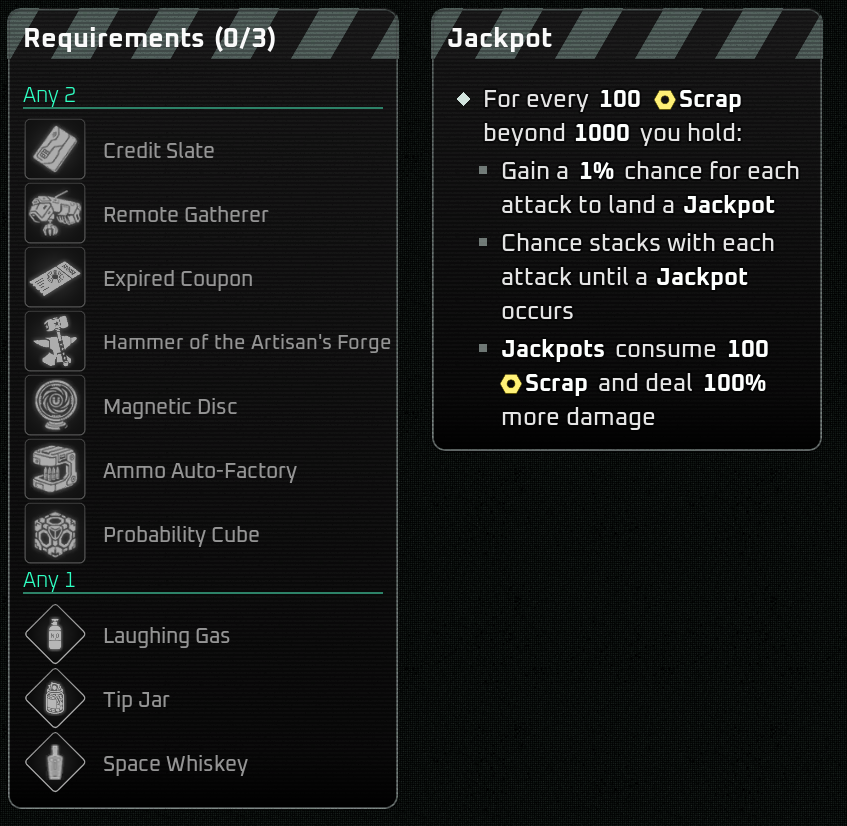
=== 6. Jackpot === | === 6. Jackpot === | ||
[[File:Jackpot.png]] | |||
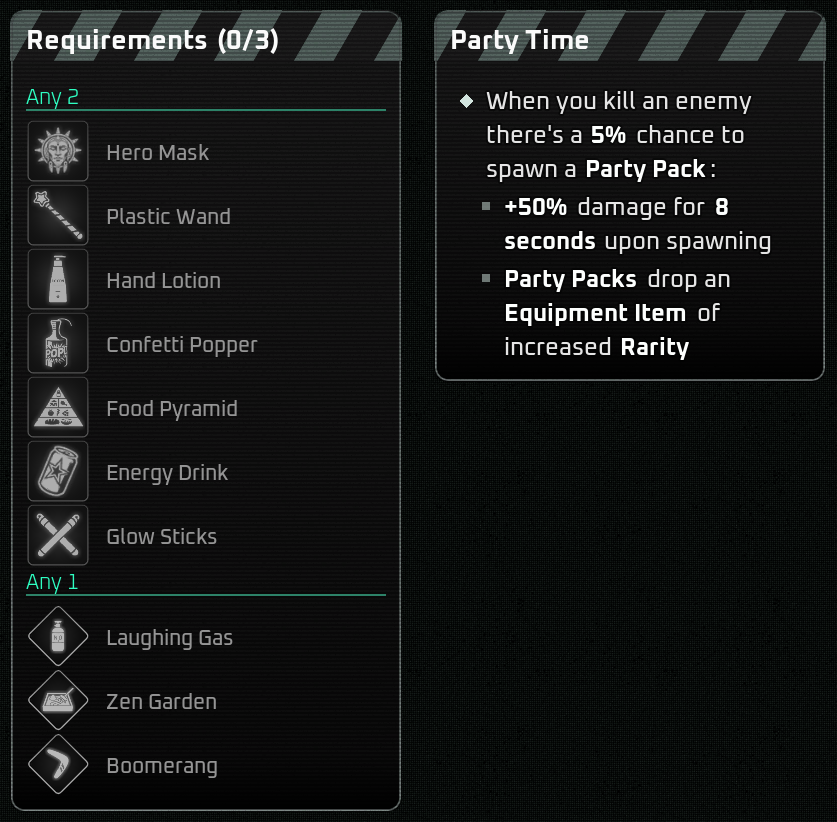
=== 7. Party Time === | === 7. Party Time === | ||
[[File:Party Time.png]] | |||
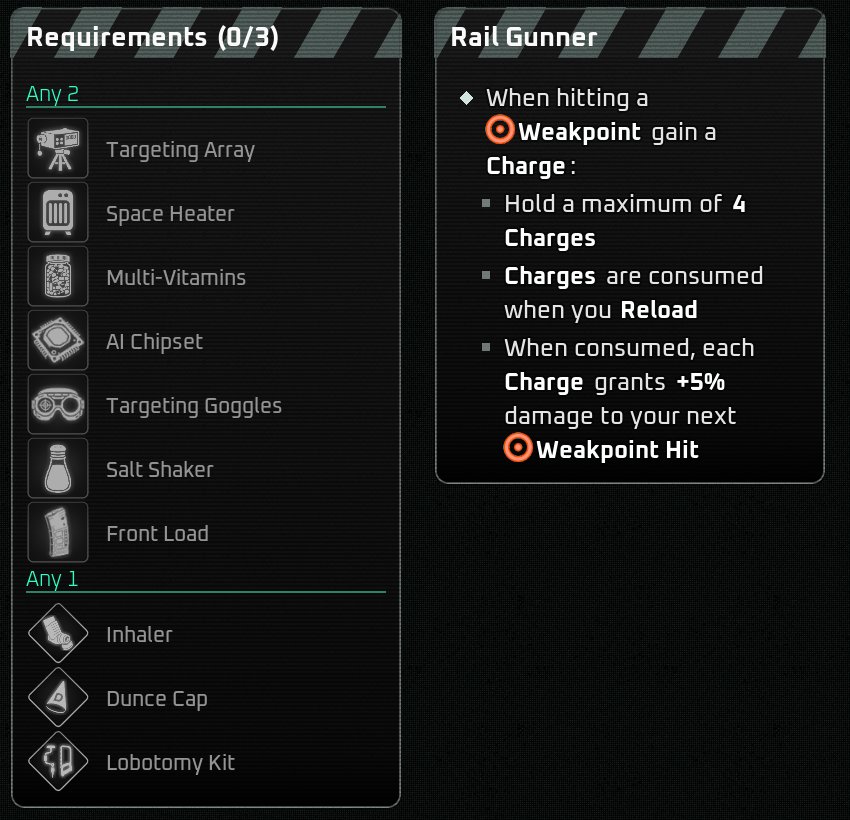
=== 8. Rail Gunner === | === 8. Rail Gunner === | ||
[[File:Rail Gunner.png]] | |||
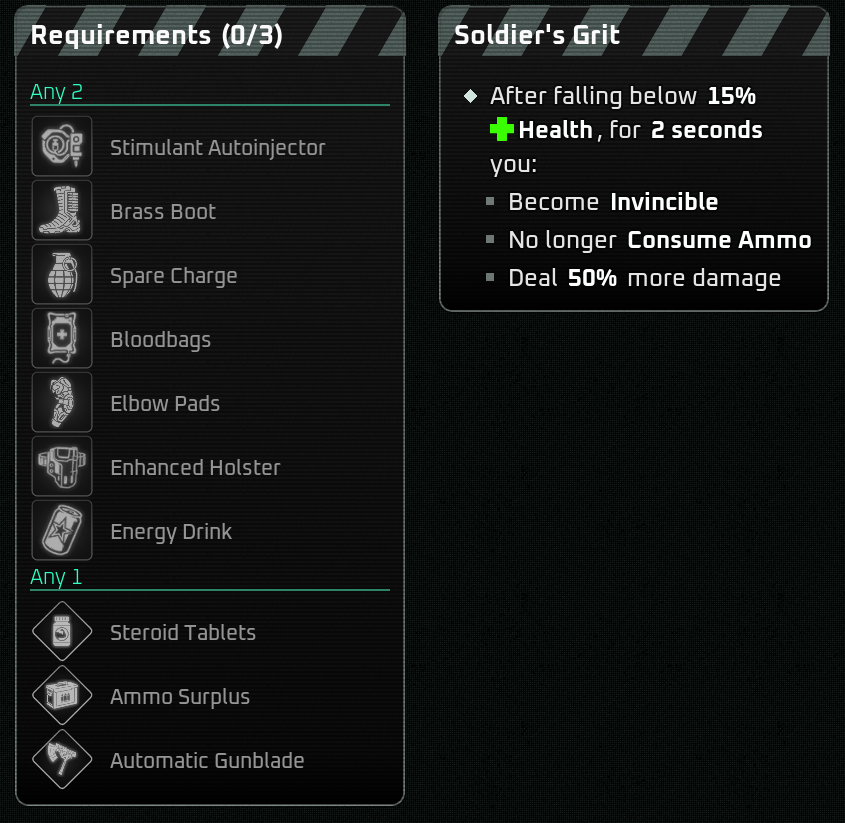
=== 9. Soldier's Grit === | === 9. Soldier's Grit === | ||
[[File:Soldier's Grit.png]] | |||
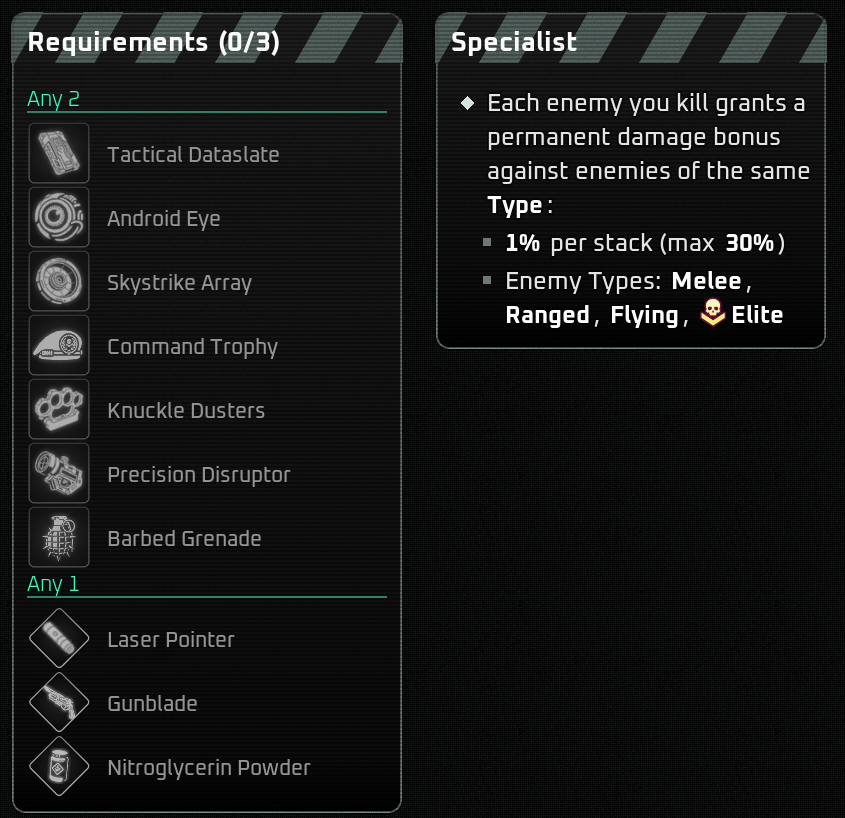
=== 10. Specialist === | === 10. Specialist === | ||
[[File:Specialist2.png]] | |||
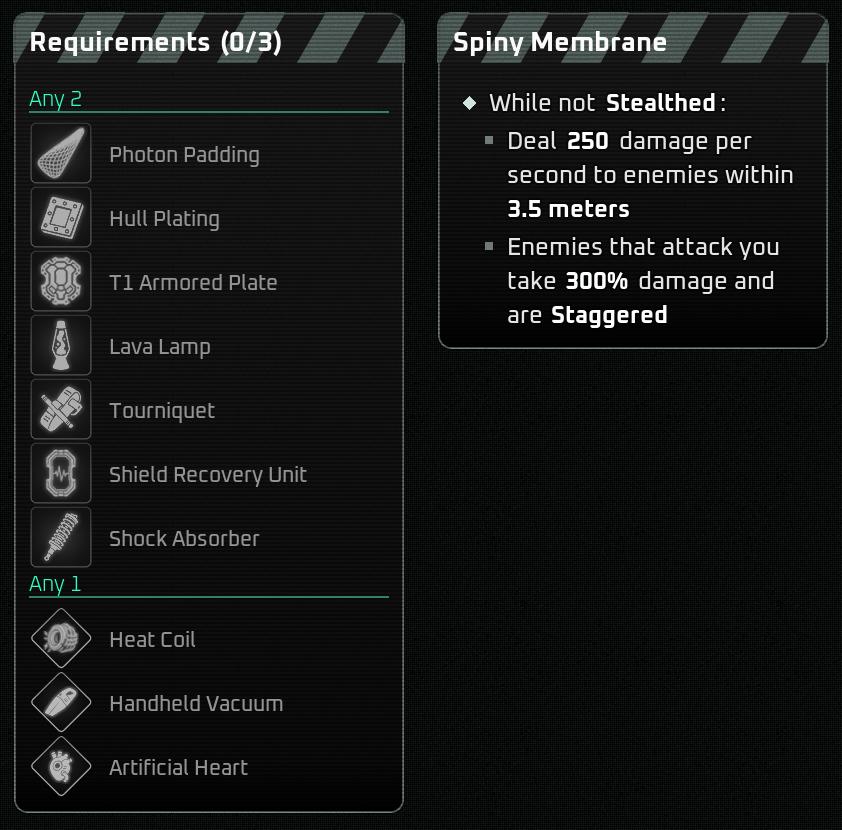
=== 11. Spiny Membrane === | === 11. Spiny Membrane === | ||
[[File:Spiny Membrane.png]] | |||
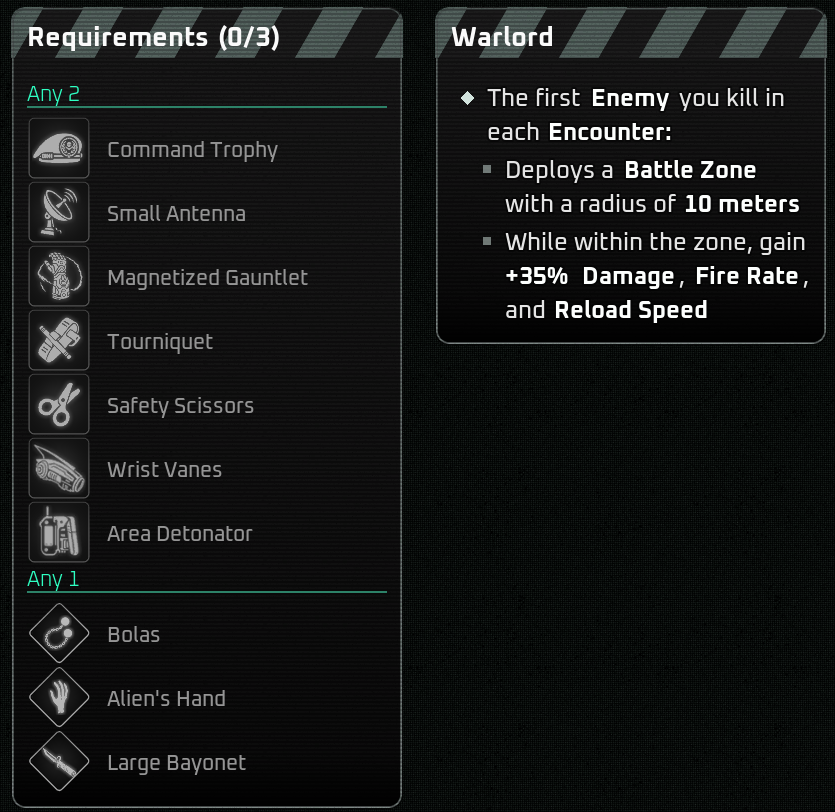
=== 12. Warlord === | === 12. Warlord === | ||
[[File:Warlord.png]] | |||
Latest revision as of 22:50, 10 September 2025
Synergies are unlocked in any Zone 3 mission. They are powerful boosts that persist until the end of the run. They are build from a combination of specific items/augments/perks/superior items.
They are split into 3 categories: Augment Synergies, Perk Synergies, Bonus Synergies.
Augment Synergies
Augment Synergies require 1 Augment, 3 Items and 1 Superior Item.
1. Bleed Glitch
2. Cascade Field
3. Conduction Arc
4. Core Splitter
5. Circuit Disruption
6. Crimson Drive
7. Crystalline Concentration
8. Deadman's Frenzy
9. Fracture Chain
10. Hollowpoint Rebound
11. Logic Override
12. Prism Mag
13. Remote Execution
14. Scopebreaker Halo
15. Thermal Lock
Perk Synergies
Perk Synergies require 1 Perk, 2 Items and 1 Superior Item.
1. Blade Specter
2. Chains of Darkness
3. Consecutive Striker
4. Dome Shield
5. Dynamicism
6. Elemental Ascendant
7. Engineer
8. Fireworks
9. Ice Barrier
10. Lightning Caller
11. Psionic Whips
12. Reactive Defense
13. Regeneration
14. Ring of Fire
15. Switch Hitter
16. Volatile Plasma
Bonus Synergies
Bonus Synergies require 2 Items and 1 Superior Item.
