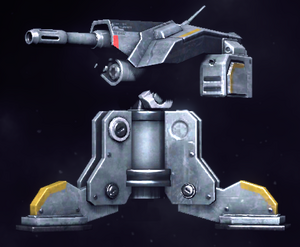
Tribes: Ascend/Light Turret
More actions
The Light Turret is a deployable weapon used by the Technician class in the game Tribes: Ascend. With upgrades the Technician can deploy up to two turrets at a time.
Operation
The Light Turret can be deployed almost anywhere, and acts like a mobile Base Turret. It can also be repaired, like any other base asset. To deploy a turret, simply press the pack button and a holographic representation of the turret will be displayed. This makes turret placement much easier than in previous Tribes games, as you know exactly where the turret will be when it's deployed. If the holo is red then the turret cannot be deployed in it's current location. A yellow holo means that the current location is too close to another turret to be deployed; the offending turret will be highlighted for you if you look in it's direction. Green holo's mean the turret can be deployed. Once deployed an icon will appear in the bottom left of the player's HUD until the turret is destroyed.
Tactics
Turret placement is very important. If you want a turret to be guarding a specific door or hallway, you must ensure that the turret can see its targets. Turrets are also easy to destroy, so you want a place where it will see the enemy before they can take a shot at it. Sometimes turrets are deployed so they can see multiple doors/hallways and thus cover more ground. Other times turrets are deployed so they can surprise an enemy as they come around a corner. Turrets work best when paired with motion sensors or mines that will reveal Infiltrators in stealth before they can destroy the turret.
Turrets should never be left alone for very long. If a turret is placed and then left to fend for itself, you can almost guarantee that the enemy players will get around or destroy it. They are an important part of base defense, but have many weaknesses. Their lock-on time for example gives human players an opportunity to destroy them without any damage at all. If a turret is destroyed, try and set it's replacement in a different spot to keep the enemy guessing.
Flag Defense
When defending the flag, turrets should be placed in locations where the enemy cannot pick them off from a distance. It is also important that they be able to see cappers as they come in to minimize the lock-on delay. A single turret will rarely kill a capper on it's own, as a skilled capper will only be in range for a few seconds at best. Multiple turrets will help, but pairing turrets with mines, claymores, or force fields will provide a much higher kill-count. Place them outside a minefield for example and they can either weaken cappers before they hit the mines or finish them off after. Remember to place turrets along common skiing routes.
Generator Defense
Depending on the map, turrets can be deployed to either keep enemies out of the base itself, or just the gen room. Turrets hidden behind corners will surprise the enemy, but many common turret locations are checked by enemies as a matter of course. Turrets should be placed where they can see the enemy and at least get a few shots off before they are destroyed. It's also important to keep other players in mind when placing turrets; if a Doombringer deploys a force field in a doorway the turret must be placed either in front or behind it and each have different advantages.

